Get Hooked On Crochet Hooks!

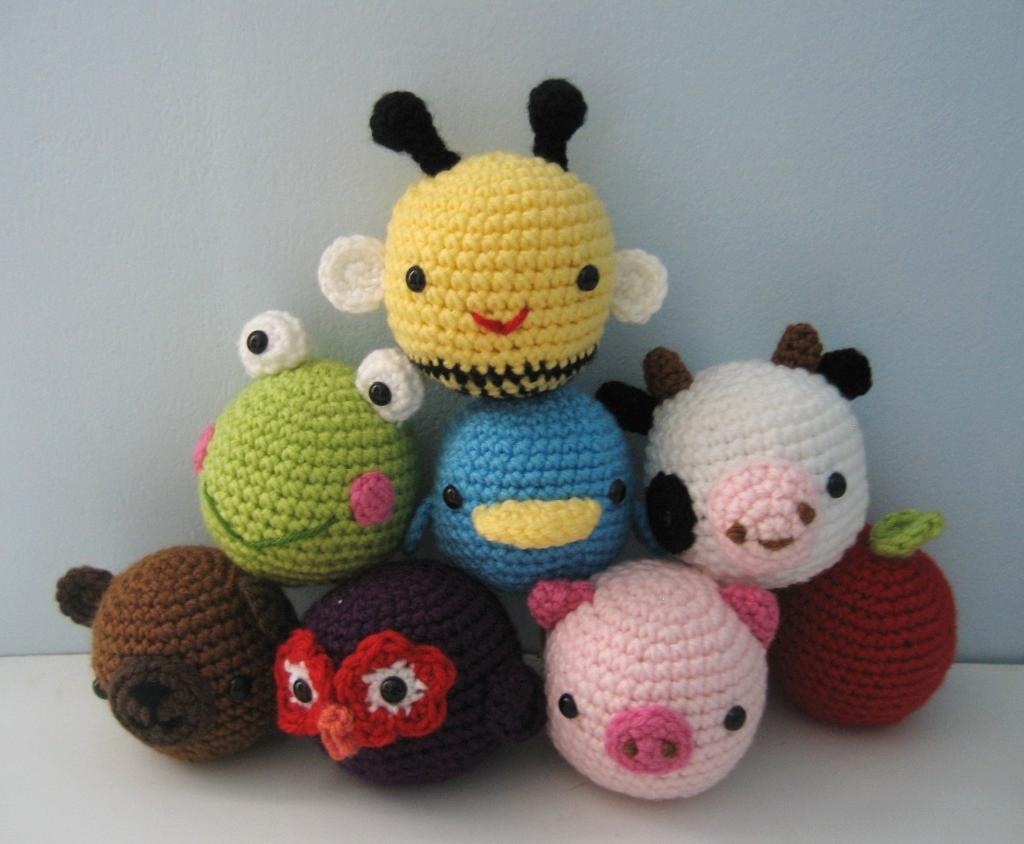
There are many types of crochet hooks in this world. B-K and 00-12. Not to mention plastic or metal crochet hooks. I have no idea why the makers of crochet hooks would begin with the letter “B” and not “A”. The bigger the crochet hook the larger the project will be. The “B” crochet hook is the smallest while the “K” crochet hook is the largest. While shopping for hooks, it makes you feel like a kid in a candy store. For Christmas, I couldn’t believe that I got this amazing crochet hook set. It had all the hooks that I could ever want!

Based on some research, the larger the hook you use determines mainly the size of your project. But hook size to me doesn’t influence my decisions. Sometimes, yarns will display the recommended hook size for you to use. See my other post, “Yarn!” , and read all about sizes and everything else.

In my opinion, one of the main differences between crochet hooks is not only the size, but whether or not its plastic or metal. I have metal hooks although I’ve never tried plastic ones. I’m sure it doesn’t affect the project in anyway, it’s just the preference of the crocheter. For example, some people like to use ice cream scoops while others like to just use spoons.

So. Let’s do a vote!

Rubber Band Bracelets: The Stretchiest New Trend

Hi everyone! Have you ever seen your friends wearing rubber band bracelets? Well, now you can make them inexpensively. First, you’ll need a Rainbow Loom to get started. Inside the box you’ll find a rubber band bracelet loom, rubber bands, and a hook. I personally like to organize my rubber bands. You can do this by stapling bags to create sections them organizing them by color.


Here’s the how-to for:

The Basic Rubber Band Bracelet

  1. Grab your loom and the colors that you want.
  2. Turn the loom so that the arrow is facing away from you.
  3. Begin placing the first rubber band on the arrow to an adjacent nub.
  4. Then, starting at where you placed the first rubber band, overlap the second color to the next nub.
  5. Be sure that the colors are overlapping one another. This is crucial for later steps.
  6. Continue looping using the same pattern.
  7. Finish to the end of the row.
  8. When your done, flip the loom so that the arrow is pointing toward you.
  9. Using your Rainbow Loom hook, skip the first rubber band and hook the color under it.
  10. Grab the rubber band (blue) and gently pull with the rubber band still on the hook.
  11. Loop it on the adjacent nub.
  12. Hook the color under the blue rubber band (in the diagram you would’ve hooked green)
  13. Gently grab and pull off the nub.
  14. Then hook it to the adjacent one.
  15. Repeat steps 12-14 till the end of the row. Careful, sometimes the rubber bands fall off the hook. To prevent this from happening, use your finger to assist the hook.
  16. Then take a C clip, and hook it on to the first rubber band with the arrow facing you.
  17. Now it is time to remove the bracelet. Pick up the C clip the the rubber band still hooked on and gently pull off the rubber bands.
  18. Continue to pull. Do not worry if the rubber bands come off in a weird way, since they are looped it’s fine. As you pull, you will begin to see the bracelet forming.
  19. Stop at the last loop.
  20. Hook the C clip on to the remaining loop and you’re done!

How to: Make a Crochet Ball

Hi everyone! Sorry I haven’t been posting, I’ve been really busy. Well, here’s an awesome video tested by yours truly about making crochet balls! I was so excited when I made my first crochet ball and I’m sure you’ll be to!

Note: I do not own this video. Video credit: naztazia from YouTube.

Yarn!

Have you ever been to the yarn isle in a craft store? It is amazing! While walking through the yarn isle, I felt like a kid in a candy store or in this case a kid in a yarn isle. There were so many colors and sizes I felt as if I could stay there forever. Some yarns felt like soft felt while others felt like sandpaper. I ended up purchasing Red Heart Super Saver light blue and white yarn for a great deal. However, while walking through the isles I just couldn’t believe how expensive some are. I mean, $15.99 for one ball of yarn. Isn’t that a bit overpriced?

There are many types and specific sizes of yarn. The yarn chart begins with super fine then ends with super bulky. Yarns are also categorized based on the specific project done. For example, you most likely wouldn’t use super bulky yarn to make a baby sock.

On Red Heart Super Saver yarn, you can recognize the little yarn symbol that says “4”. It is identifiable on the chart and has the word “Worsted” on it.

Yarn Weight

So the next time you purchase yarn, remember to think about the weight and type for your next project!

Crochet Cramp?!

After crocheting for approximately two hours straight, my right hand began to hurt like crazy! I don’t know if crochet cramps exist, but they sure do hurt. It hurt in the knuckle and was extremely sore afterwards. Fortunately, my desire to finish my current project drove me through the agonizing pain. But I guess with all activities, you could get a cramp or be just plain sore from anything.

My solution was to crochet with less tension. Turns out I was holding it pretty tight. For me, whenever I do something I grip it as if I am holding on for my life. I don’t know why, but I just can’t relax or let go. Then again, it was my first time crocheting. So after adjusting the grip tension, I was able to crochet for another half hour or so without pain. :)

The Art of Amigurumi

noun, (a-me-goo-roo-me)
the art of crocheting or kniting a stuffed toy
photo credit: craftsy.com

photo credit: craftsy.com

Amigurumi is one of the main reasons I started crocheting. To me, it is one of the cutest parts of crafting. I learned about amigurumi a month ago from my best friend. She gave me an acorn that she had crocheted herself. It was so cute that I just had to give it a try!

To make amigurumi, you’ll need yarn, a crochet hook, stuffing, plastic eyes, felt, a needle and thread. Crochet balls are the basic structure of amigurumi character’s body and face. However, these crochet balls are one the the biggest challenges for me. For some reason, I just can’t get the ball to take proper shape no matter how many Youtube videos or books I read. But hopefully while blogging I’ll be able to teach you and myself how to crochet balls! According to Amigurumi Toy Box: Cute Crocheted Friends, it says to stuff the toy so it retains and holds its shape. However, you’re not supposed to stuff it too much or else the stitches will show and the fabric will stretch.

Plastic eyes, buttons, a needle and thread, and felt are all used for the face or body of the toy. Some amigurumi require needle and thread to embroider or stitch the faces of the toys. Additionally, amigurumi are sometimes required to be sown together. Felt can be used for the body or face to replace embroidered noses or eyes. For example, sowing on black felt for tiger stripes or bee wings. Buttons are used for the toy’s clothing or face. In many patterns, you’ll find the use of plastic eyes. However, plastic eyes are sometimes dangerous for young infants to play with. Therefore, embroider or use felt to replace plastic eyes. All of these materials can be found at a craft store.

photo credit: amazon.com

photo credit: amazon.com

For the holidays, I got this awesome book called Amigurumi Toy Box: Cute Crocheted Friends. So every other week or so, I’ll share some of my favorite patterns for these adorable toys. Hope you like it!